开始

# 开始

# 模板语法

  • {{ xxx }}:插值表达式(Mustache 语法),xxxjs表达式。

# 渐进式框架

Vue 从设计角度来讲, 虽然能够涵盖这张图上所有的东西,但是你并不需要一上手就把所有东西全用上(主张最少) ,因为没有必要。无论从学习角度,还是实际情况,这都是可选的。声明式渲染组件系统Vue的核心库所包含内容,而客户端路由状态管理构建工具都有专门解决方案。这些解决方案相互独立,你可以在核心的基础上任意选用其他的部件,不一定要全部整合在一起。

MVVMPattern
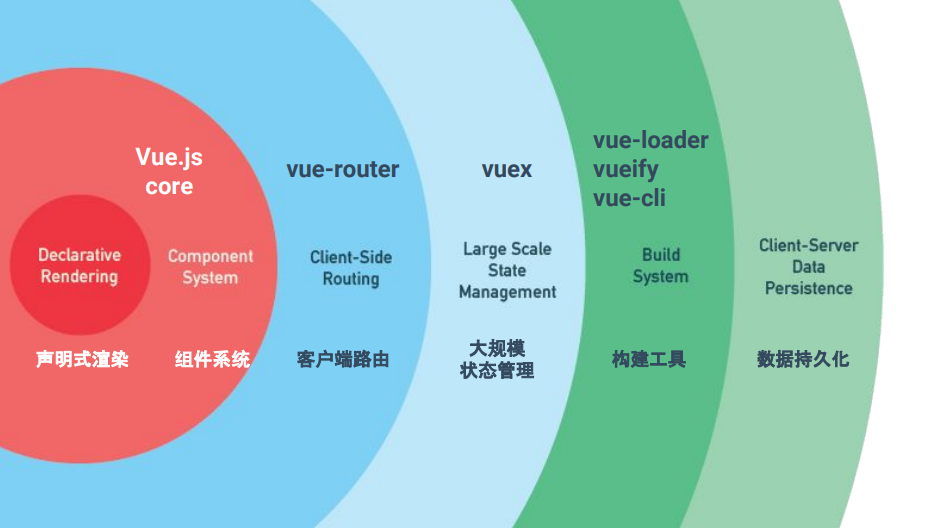
  • 声明式渲染:DOM 随状态(数据)更新而更新。(声明式:关注结果,命令式:关注过程(jQuery))
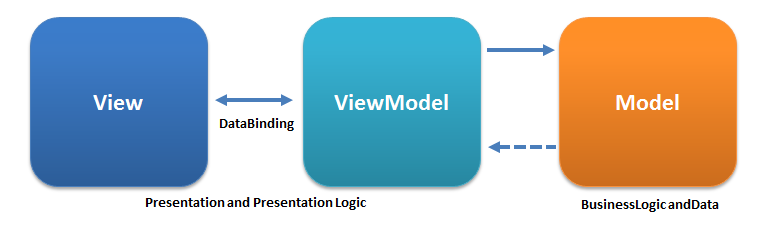
# mvvm 框架

  • 虽然没有完全遵循 MVVM 模型 (opens new window),但是Vue的设计也受到了它的启发。因此在文档中经常会使用 vm(ViewModel的缩写) 这个变量名表示 Vue实例。通过用 Vue 函数创建一个新的**Vue 实例**。

    var vm = new Vue({
      // 选项
    });
    
    1
    2
    3
  • MVVMModel–view–viewmodel)是一种软件架构模式 (opens new window)MVVM支持双向绑定,意思就是当 M 层数据进行修改时,VM层会监测到变化,并且通知 V 层进行相应的修改,反之修改 V 层则会通知 M 层数据进行修改,以此也实现了视图与模型层的相互解耦。View 的变动,自动反映在ViewModel,反之亦然。

  • 关系图

    MVVMPattern

  • 响应式原理

    1. 侵入式:this.a++(不调用方法)

      非侵入式:this.setState({a:this.state.a++})(调用方法)

    2. Object.defineProperty() (opens new window)

      //基本使用
      let obj = { b: 5 };
      Object.defineProperty(obj, "a", {
        //    value:5, //设置值
        //    writable: false, //是否可写(是否能被修改)
        //    enumerable:false,//是否可被枚举(循环对象是否能被输出)
        get() {
          console.log("访问a");
          return 6; //return的值是设置a的属性,没有return,下次访问a是undifined
        },
        set(newValue) {
          console.log("设置a");
          console.log(newValue); //被设置的值被当做参数传入set
        },
      });
      obj.a = 7;
      console.log(obj.a); //a=6,访问时又走了get,在使用临时变量保存改变的值,在set的时候赋值给临时变量,get中返回临时变量
      
      1
      2
      3
      4
      5
      6
      7
      8
      9
      10
      11
      12
      13
      14
      15
      16
      17
      //getter/setter需要临时变量周转才能工作
      let obj = {};
      let temp;
      Object.defineProperty(obj, "a", {
        get() {
          console.log("访问a");
          return temp;
        },
        set(newValue) {
          console.log("设置a");
          temp = newValue;
        },
      });
      obj.a = 7;
      console.log(obj.a);
      
      1
      2
      3
      4
      5
      6
      7
      8
      9
      10
      11
      12
      13
      14
      15
      //封装成函数defineReactive
      let obj = {};
      function defineReactive(data, key, val) {
        //data:数据对象,key:键值,val替代临时变量
        //函数外部可以访问val的值,get和set闭包中的环境
        Object.defineProperty(data, key, {
          enumerable: true, //可枚举
          configurable: true, //可改变或删除
          get() {
            console.log("访问" + key);
            return val;
          },
          set(newValue) {
            console.log("设置" + key);
            if (val == newValue) return;
            val = newValue;
          },
        });
      }
      defineReactive(obj, "a", 10);
      obj.a = 4;
      console.log(obj.a);
      
      1
      2
      3
      4
      5
      6
      7
      8
      9
      10
      11
      12
      13
      14
      15
      16
      17
      18
      19
      20
      21
      22
    3. 对象代理

      function Vue(options) {
          let _data = options.data()
          let _this = this
          Object.keys(_data).forEach(i => {//代理对象添加到实列原型
              Object.defineProperty(_this, i, {
                  get() {
                      console.log('Get'+i)
                      return _data[i]
                  },
                  set(newValue) {
                      _data[i]=newValue
                      return newValue
                  }
              })
          })
      
      }
      let vm = new Vue({
          data() {
              return {
                  name: 'Blueless Bird',
                  author: 'Joni'
              }
          }
      })
      vm.name='Hey Boi.'
      console.log(vm.name)
      
      1
      2
      3
      4
      5
      6
      7
      8
      9
      10
      11
      12
      13
      14
      15
      16
      17
      18
      19
      20
      21
      22
      23
      24
      25
      26
      27
    4. 其他

      //this.$options.data().xxx获取初始值
      //el > $mount
      //render > template 替换el的内容
      
      1
      2
      3

# 生命周期函数

  • 在某一时刻自动执行的函数(也叫钩子函数)

  • 图谱

    lifecycle
    1. beforeCreate在初始化 / 实例创建 之前执行的函数
    2. Created在初始化 / 实例创建 之后执行的函数,可以访问methods, data, computed等上的方法和数据
    3. beforeMount在组件内容被渲染到页面之前自动执行的函数

    (注意:可获取到vm.el,但并未挂载)

    1. Mounted在组件内容被渲染到页面之后自动执行的函数
    2. beforeUpdate在数据将要变化之前自动执行的函数
    3. updated在数据发生变化之后自动执行的函数
    4. beforeUnmountVUE实例销毁之前自动执行的函数
    5. unmountedVUE 实例销毁之后自动执行的函数
    6. errorCaptured 捕获一个来自子孙组件的错误时被调用

不要在选项 property 或回调上使用箭头函数 (opens new window),比如 created: () => console.log(this.a)vm.$watch('a', newValue => this.myMethod())。因为箭头函数并没有 thisthis会作为变量一直向上级词法作用域查找,直至找到为止,经常导致 Uncaught TypeError: Cannot read property of undefinedUncaught TypeError: this.myMethod is not a function 之类的错误。

  • hook

    export default{
      methods:{
        fn(){
          const timer = setInterval(()=>{
            //具体执行代码
            console.log('1');
          },1000);
          this.$once('hook:beforeDestroy',()=>{
            clearInterval(timer);
            timer = null;
          })
        }
      }
    }
    
    1
    2
    3
    4
    5
    6
    7
    8
    9
    10
    11
    12
    13
    14
    //父组件
    <rl-child @hook:mounted="childMountedHandle"
    />
    //vue3 改为@vnode-updated
    method () {
      childMountedHandle() {
      // do something...
      }
    },
    
    1
    2
    3
    4
    5
    6
    7
    8
    9
  • 父子组件生命周期执行顺序

    初始化:

    life

    原理:子组件作为父组件的DOM子节点,父组件实例化完成后要挂载这个父组件,调用父组件的render方法方向有子组件,则去 创建渲染子组件并缓存(因为可能有多层),子组件都完成完成父组件的挂载 子组件挂载完成后,父组件还未挂载

    更新 同理:先完成子组件的更新,再完成父组件

    父beforeUpdate -> 子beforeUpdate -> 子updated -> 父updated

    销毁

    父beforeDestroy -> 子beforeDestroy -> 子destroyed -> 父destroyed


# 计算属性

  • 计算属性:依赖 data 中的数据进行计算,与 methods 不同的是只有响应式依赖发生改变时才进行重新计算(计算属性是基于它们的响应式依赖进行缓存的)。模板内的表达式非常便利,但是设计它们的初衷是用于简单运算的。在模板中放入太多的逻辑会让模板过重且难以维护。

    2
    <div>{{nmu1}}</div>
    <script>
        export default {
            data() {
                return {
                    num: 1,
                };
            },
            computed: {
                nmu1() {
                    //this指向vm实例,需要使用函数声明
                    return this.num + 1;
                },
            },
        };
    </script>
    
    1
    2
    3
    4
    5
    6
    7
    8
    9
    10
    11
    12
    13
    14
    15
    16
    显示代码 复制代码
  • 计算属性的 getter 和 setter

    当我们取计算属性值的时候会执行 get 方法(模板使用),设置的时候会执行 set 方法,computed 属性默认为 getter,但是它还提供了 setter,可以由因变量去影响自变量。

    wangcai

    <template>
    <input v-model="fullname" type="text" />
    <p>{{fullname}}</p>
    </template>
    <script>
        export default {
            data() {
                return {
                    firstName: "wang",
                    lastName: "cai",
                };
            }, //可以return fuc传参
            computed: {
                fullname: {
                    //这时fullname是对象
                    get: function () {
                        console.log("设置值");
                        return this.firstName + this.lastName;
                    },
                    set: function (value) {
                        console.log(value); //这里的value是fullname
                        this.firstName = "zhang"; //当改变fullname时执行set函数
                        this.lastName = "shang";
                    },
                },
            },
        };
    </script>
    
    1
    2
    3
    4
    5
    6
    7
    8
    9
    10
    11
    12
    13
    14
    15
    16
    17
    18
    19
    20
    21
    22
    23
    24
    25
    26
    27
    28
    显示代码 复制代码

# 侦听器

  • 监听属性,属性变化时,自动执行里面的函数,参数:current(现在参数的值),prev(以前参数的值)

    <input v-model="firstName" type="text" />
    <p>{{fullname}}</p>
    <script>
      export default {
        watch: {
          firstName: function (n, o) {
            //改变firstName,执行函数,改变fullname
            this.fullname = n + this.lastName;
            console.log(o);
          },
        },
      };
    </script>
    
    1
    2
    3
    4
    5
    6
    7
    8
    9
    10
    11
    12
    13
  • 深度监听

    1. handler方法和immediate属性

      最初绑定的时候是不会执行的,要等到 firstName 改变时才执行监听计算,修改一下 watch 写法使其初绑定的时候就执行。

      watch: {
          firstName: {
              handler(n, o) {
                  this.fullname =n+this.lastName
                  console.log(o)
              },
                  immediate:true
          },
      },
      
      1
      2
      3
      4
      5
      6
      7
      8
      9
    2. deep属性

      watch里面还有一个属性 deep,默认值是 false,代表是否深度监听。

      <input v-model="obj.a" type="text" />
      <p>{{ obj.a }}</p>
      <script>
        export default {
            data(){
                return {
                    obj: { a: 123 },
                }
            }
            watch: {
            obj: {
            handler() {
                this.obj.a = 567;
                console.log("change");
            },
                //immediate: true,
                deep: true
        //obj.a变化时执行函数,给对象的所有属性都加上监听器
        },
        },
        }
      </script>
      
      1
      2
      3
      4
      5
      6
      7
      8
      9
      10
      11
      12
      13
      14
      15
      16
      17
      18
      19
      20
      21
      22
      //优化,使用字符串形式监听
      watch: {
          'obj.a': { //只给obj.a加监听器
              handler() {
                  console.log("change");
              },
                  immediate: true,
                      deep: true
          },
      },
      
      1
      2
      3
      4
      5
      6
      7
      8
      9
      10
  1. 注销 watch

    watch 写在组件中,会随着组件的销毁而销毁。如果使用下面这样的方式写 watch,那么就要手动注销。

    const unWatch = app.$watch("text", (newVal, oldVal) => {
      console.log(`${newVal} : ${oldVal}`);
    }); //返回unWatch方法
    
    unWatch(); // 手动注销watch
    
    1
    2
    3
    4
    5
  2. watch 监听路由

    可以使用 watch 来进行路由的监听

    watch: {
      changeShowType(value) {
          console.log("-----"+value);
      },
          '$route'(to,from){
              console.log(to);   //to表示去往的界面
              console.log(from); //from表示来自于哪个界面
              if(to.path=="/shop/detail"){
                  console.log("商品详情");
              }
          }
    },
    
    1
    2
    3
    4
    5
    6
    7
    8
    9
    10
    11
    12

# 过滤器

用于一些常见的文本格式化,用在双花括号插值和 v-bind 表达式中。

2023-09-01
{{date|format("prop")}}
<!-- date作为format函数的参数,format也可以传参 -->
<script>
  export default {
    data() {
      return {
        date: new Date(),
      }
    },
    filters: {
      format: function (value, prop) {
        //格式化日期
        //console.log(prop);
        const Y = value.getFullYear();
        const M = value.getMonth() + 1;
        const D = value.getDate();
        const times = Y + (M < 10 ? "-0" : "-") + M + (D < 10 ? "-0" : "-") + D;
        return times;
      },
    },
  };
</script>
1
2
3
4
5
6
7
8
9
10
11
12
13
14
15
16
17
18
19
20
21
22
显示代码 复制代码

# 指令

  • v-text

    1. 与花括号的区别是在页面加载时不显示{{}}。

    2. 在的前后可以添加其他的内容,而在 v-text 里面不行。

  • v-html

    更新元素的 innerHTML

    <p v-html="msg"></p>
    <script>
      export default {
        data() {
          return {
            msg: "<input/ placeholder='这是一个输入框'>",
          };
        },
      };
    </script>
    
    1
    2
    3
    4
    5
    6
    7
    8
    9
    10
    显示代码 复制代码

    注意

    1. 在网站上动态渲染任意 HTML 是非常危险的,因为容易导致 XSS 攻击 (opens new window)。只在可信内容上使用 v-html永不用在用户提交的内容上。
    2. 单文件组件 (opens new window)里,scoped 的样式不会应用在 v-html 内部,因为那部分 HTML 没有被 Vue 的模板编译器处理。如果你希望针对 v-html 的内容设置带作用域的 CSS,你可以替换为 CSS Modules (opens new window) 或用一个额外的全局 <style> 元素手动设置类似 BEM 的作用域策略。
    3. 浅谈XSS攻击的那些事 (opens new window)
  • v-show

    根据变量控制 dom 显示与隐藏,变量为 false 时,display:none,v-show 不支持 <template> 元素,也不支持 v-else

  • v-if

    根据变量控制 dom 显示与隐藏,变量为 false 时,直接移除 dom 元素。v-ifv-for 一起使用时,v-for 具有比 v-if 更高的优先级。

  • v-bind

    缩写::绑定 html 标签中的属性值。

    <a :[type]="'http://www.baidu.com'">百度</a>
    <!--写静态要在""中加''-->
    <br />
    <a :[type]="url">百度</a>
    <script>
      export default {
        data() {
          return {
            type: "href",
          };
        },
      };
    </script>
    
    1
    2
    3
    4
    5
    6
    7
    8
    9
    10
    11
    12
    13
  • v-on

    缩写: @事件监听器,

    1. 事件修饰符:@click.prevent(阻止默认行为)
    2. 模板中绑定事件:<Son @click=‘handleClick’> \</Son>
    3. $event传递原生事件:hanclick(count,$event),不传参数,第一个参数为e
  • # 修饰符

    表单:lazy,trim,number

    事件:stop(冒泡),prevent(阻止默认),capture(捕获,使事件触发从包含这个元素的顶层开始往下触发),once(只触发一次),self(只当在 event.target 是当前元素自身时触发处理函数),passive(onscroll事件加一个.lazy),native(监听根元素的原生事件)

    鼠标、键盘:left、right、middle:鼠标左、右、中键点击,keycode:对应键盘码


# 样式绑定

  1. 字符绑定:在 data()在定义变量,v-bind 绑定属性

    给时光以生命,给岁月以文明
    <div :class="str">{{message}}</div>
    <script>
      export default {
        data() {
          return {
            str: "red",
            message: "给时光以生命,给岁月以文明",
          };
        },
      };
    </script>
    <style>
      .red {
        color: red;
      }
      .green {
        color: green;
      }
    </style>
    
    1
    2
    3
    4
    5
    6
    7
    8
    9
    10
    11
    12
    13
    14
    15
    16
    17
    18
    19
    显示代码 复制代码
  2. 对象绑定:传给:class 一个对象

    给时光以生命,而不是给生命以时光
    <div :class="{ red:isRed, blue:isBlue }">{{message}}</div>
    <script>
        export default {
            data() {
                return {
                    message: "给时光以生命,而不是给生命以时光",
                    isRed: false,
                    isBlue: true, //根据isBlue的值控制样式
                };
            },
        };
    </script>
    <style>
        .red{
            color:red;
        }
        .blue{
            color:skyblue
        }
    </style>
    
    1
    2
    3
    4
    5
    6
    7
    8
    9
    10
    11
    12
    13
    14
    15
    16
    17
    18
    19
    20
    显示代码 复制代码

    或者

    <div :class="{ red:false,green:true}">{{message}}</div>
    
    1
  3. 数组绑定:把数组传给 :class

    <div :class="['red', 'active']">{{ message }}</div>
    
    1

    或者 data()中定义数组

    或许是不知梦的缘故,流离之人追逐幻影。
    <div :class="classArray">{{ message }}</div>
    <script>
        export default {
            data() {
                return {
                    message: "或许是不知梦的缘故,流离之人追逐幻影。",
                    classArray: ["pink", "active"],
                };
            },
        };
    </script>
    <style>
        .pink{
            color:pink;
        }
        .active:hover{
            font-weight:bold
        }
    </style>
    
    1
    2
    3
    4
    5
    6
    7
    8
    9
    10
    11
    12
    13
    14
    15
    16
    17
    18
    19
    显示代码 复制代码
  4. 行内动态样式

    1. 字符串形式

      The closer you look,the less you see.
      <div :style="red">{{ message }}</div>
      <script>
          export default {
              data() {
                  return {
                      message: "The closer you look,the less you see.",
                      red: "color:gold", //字符串样式
                  };
              },
          };
      </script>
      
      1
      2
      3
      4
      5
      6
      7
      8
      9
      10
      11
      显示代码 复制代码
    2. 对象形式

      These violent delights have violent ends
      <div :style="styleObj">{{ message }}</div>
      <script>
        export default {
          data() {
            return {
              message: "These violent delights have violent ends",
              styleObj: { color: "greenYellow " }, //对象样式
            };
          },
        };
      </script>
      
      1
      2
      3
      4
      5
      6
      7
      8
      9
      10
      11
      显示代码 复制代码

    其他

    <el-button :style="list[types]" @click="change" ref="btn">点击变色</el-button>
    <script>
        export default {
            data() {
                return {
                    list:[
                        "backgroundColor:red",
                        "backgroundColor:blue",
                        "backgroundColor:yellow"],
                    types:1
                };
            },
            methods: {
                change(){
                    this.types=++this.types%3
                }
            }
        }
    </script>
    
    1
    2
    3
    4
    5
    6
    7
    8
    9
    10
    11
    12
    13
    14
    15
    16
    17
    18
    19
    显示代码 复制代码
    <el-button
            :class="{red:types==0,
                    blue:types==1,
                    yellow:types==2}"
            @click="types=++types%3"
            ref="btn"
            >
        点击变色
    </el-button>
    <script>
        export default {
            data() {
                return {
                    list:["red","blue","yellow"],
                    types:0
                };
            }
        }
    </script>
    
    1
    2
    3
    4
    5
    6
    7
    8
    9
    10
    11
    12
    13
    14
    15
    16
    17
    18
    19
    显示代码 复制代码

# 列表循环

  • v-for:循环可迭代对象(数组,对象,字符串,数字),vue 要求增加 key 值**(字符串、数值)**避免重复渲染。

  • 零化域的缺失之环
  • 闭时曲线的碑文
  • 对偶福音的规约
  • 模糊像散的孤独
  • 二律背反的双重人格
  • 永劫回归的潘多拉
  • 回折叙唱的鹅妈妈
  • 盟誓的文艺复兴
<li v-for="(item,index) in list" :key="index">{{item}}</li>
<script>
  export default {
    data() {
      return {
        list: [
          "零化域的缺失之环",
          "闭时曲线的碑文",
          "对偶福音的规约",
          "模糊像散的孤独",
          "二律背反的双重人格",
          "永劫回归的潘多拉",
          "回折叙唱的鹅妈妈",
          "盟誓的文艺复兴",
        ],
      };
    },
  };
</script>
1
2
3
4
5
6
7
8
9
10
11
12
13
14
15
16
17
18
19
显示代码 复制代码

index 作为 key,逆序添加、逆序删除会导致key发生变化当成新的节点,产生没有必要的真实 DOM 更新

  • 数组方法:

    1. push():从数组尾部添加内容

    2. unshift():从数组头部添加内容

    3. pop():从数组末尾删除内容

    4. shift():从数组头部删除内容

    5. sort():对数组进行排序

    6. reverse():对数组进行取反

    7. splice():从数组中筛出具体的内容

  • 循环与判断不写在同一标签上,v-for 的优先级比 v-if 更高。


  • # 虚拟DOM

    • JS按照DOM结构来实现的树形结构对象

      graph LR
      A(数据改变)-->B(虚拟dom计算变更)-->C(真实dom)-->D(视图更新)
      
      1
      2
      //snabbdom
      import {init, classModule,propsModule, styleModule,eventListenersModule, h} from "snabbdom"; //使用snabbdom库
      const patch = init([classModule, propsModule, styleModule, eventListenersModule]); //初始化patch函数
      const vNode = h("ol", {}, [
          //标签,属性,孩子节点/文本节点(children和text只会存在一个)
          h("li", null, "one"),
          h("li", null, "two"),
      ]);//h函数创建vNode并返回
      const container = document.getElementById("container");//容器
      patch(container, vNode); //将vnode替换空容器,如果patch第一个参数为真实dom,创建vnode并关联dom
      const newVnode = h("ol", null, [
          h("li", null, "one"),
          h("li", null, "two"),
          h("li", null, "three"),
      ]);
      patch(vNode, newVnode)//更新dom,vNode已关联dom
      
      1
      2
      3
      4
      5
      6
      7
      8
      9
      10
      11
      12
      13
      14
      15
      16
    • diff

      同级比较:Diff算法比较只会在同层级进行, 不会跨层级比较

      patch:对比当前同层的虚拟节点是否为同一种类型的标签,是继续执行patch进行深层比对,不是把节点替换成新虚拟节点

      sameVnode:判断是否为同一类型节点(key值,标签名。。。)


    # 双向绑定

    • v-modle:本质上是语法糖

      1. texttextarea 元素使用 value property 和 input 事件;
      2. checkboxradio使用 checked property 和 change 事件;
      3. select 字段将 value 作为 prop 并将 change 作为事件

      记忆就像镜子,映照出灵魂的模样。

      <input type="text" v-model="message" size="30"/>
      <p>{{message}}</p>
      <script>
          export default {
              data() {
                  return {
                      message: '记忆就像镜子,映照出灵魂的模样。',
                  };
              },
          }
      </script>
      
      1
      2
      3
      4
      5
      6
      7
      8
      9
      10
      11
      显示代码 复制代码

      An act of creation always begins with an act of destruction.

      原理

      <input type="text" :value="text" @input="text=$event.target.value" size="50"/>
      <!--value绑定值,input事件获取输入框输入的内容赋值给text-->
      <!--$event是事件对象,$event.target则指的是事件触发的目标,即哪一个元素触发了事件,这将直接获取该dom元素 -->
      <p>{{text}}</p>
      <script>
          export default {
              data() {
                  return {
                      text: 'An act of creation always begins with an act of destruction.',
                  };
              },
          }
      </script>
      
      1
      2
      3
      4
      5
      6
      7
      8
      9
      10
      11
      12
      13
      显示代码 复制代码
    • 修饰符

      v-model.lazy 失去焦点才触发双向绑定

      v-model.number 用户输入的值自动转变为 number 类型

      v-model.trim去掉字符串前后空格

    • .sync 修饰符

      类似于v-modle,也是一个语法糖,使子组件能够修改父组件的值,不限制标签

      <!--父组件-->
      <div id="app">
        .sync的使用
        <el-button v-if="!show" @click="show=true">显示</el-button>
        <Son :visible.sync="show" />
        <!--:visible.sync="show"是
      @update:visible="(val)=>{show = val}" 和             
      :visible="show"的语法糖-->
      </div>
      <script>
        import Son from "./components/Son.vue";
        export default {
          name: "App",
          data() {
            return {
              show: false,
            };
          },
          components: {
            Son,
          },
        };
      </script>
      
      1
      2
      3
      4
      5
      6
      7
      8
      9
      10
      11
      12
      13
      14
      15
      16
      17
      18
      19
      20
      21
      22
      23
      <!--子组件-->
      <div v-if="visible">
        对话框
        <el-button @click="$emit('update:visible', false);">隐藏</el-button>
        <!--触发update:visible事件改变父组件的值-->
      </div>
      <script>
        export default {
            name: "Son",
            data(){
                return {
                },
                    props: {
                        visible: { type: Boolean, default: false },
                    },
            }
      </script>
      
      1
      2
      3
      4
      5
      6
      7
      8
      9
      10
      11
      12
      13
      14
      15
      16
      17

    # 组件

    • 组件注册(定义==>注册==>使用)

      1. 定义子组件(子组件必须要有唯一的根标记)

        <div>我是子组件</div>
        <script>
          export default {
              name: "Son",
              data(){
                  return {//一个组件的 data 选项必须是一个函数,如果 Vue 没有这条规则,就会影响到其它所有实例
                  }
              }
        </script>
        
        1
        2
        3
        4
        5
        6
        7
        8
        9
      2. 注册组件

        //根组件中全局注册
        /*Vue.component('my-component-name', {
          // ... 选项 ...
        })*/
        import Son from "./components/Son.vue";
        import Vue from "vue";
        Vue.component("Son", Son);
        //组件命名 大驼峰引入,大驼峰或横线注册,html中大驼峰或横线使用
        
        1
        2
        3
        4
        5
        6
        7
        8
        <!--父组件中局部注册并使用-->
        <div>
          我是父组件
          <Son />
          <Son />
        </div>
        <script>
          import Son from "./components/Son.vue";
          import Son1 from "./components/Son1.vue";
          export default {
            components: {
              Son,
              //"Son":Son简写,为了和普通变量区分,建议首字母大写
              Son1,
            },
          };
        </script>
        
        1
        2
        3
        4
        5
        6
        7
        8
        9
        10
        11
        12
        13
        14
        15
        16
        17
    • 父子组件通信

      # 父子组件的关系可以总结为prop向下传递,事件向上传递。

      1. 父组件通过自定义属性传值,子组件props接收.

        camelCase(驼峰命名法) 的 prop 名需要使用其等价的 kebab-case (短横线分隔命名) 命名

        不能修改传递过来的数据

        <!--父组件-->
        <div id="app">
          我是父组件
          <Son :message="msg" />
          <!--使用v-bind绑定动态Prop-->
          <Son :message="msg1" />
        </div>
        <script>
          import Son from "./components/Son.vue";
          export default {
            name: "App",
            data() {
              return {
                msg: "hello!",
                msg1: "Son",
              };
            },
            components: {
              Son,
            },
          };
        </script>
        
        1
        2
        3
        4
        5
        6
        7
        8
        9
        10
        11
        12
        13
        14
        15
        16
        17
        18
        19
        20
        21
        22
        <!--子组件-->
        <div>{{ message }}</div>
        <script>
          export default {
              name: "Son",
              data(){
                  return {
                  },
                      props: ['message'],//以字符串数组形式列出的 prop,prop不能与data中的数据重名
              }
        </script>
        
        1
        2
        3
        4
        5
        6
        7
        8
        9
        10
        11

        Prop验证:props为带有验证需求的对象,prop验证失败的时候, Vue 将会产生一个控制台的警告

        props: {
            // 基础的类型检查 (`null` 和 `undefined` 会通过任何类型验证)
            propA: Number,
                // 多个可能的类型
                propB: [String, Number],
                    // 必填的字符串
                    propC: {
                        type: String,
                            required: true
                    },
                        // 带有默认值的数字
                        propD: {
                            type: Number,
                                default: 100
                        },
                            // 带有默认值的对象
                            propE: {
                                type: Object,
                                    // 对象或数组默认值必须从一个工厂函数获取
                                    default: function () {
                                        return { message: 'hello' }
                                    }
                            },
                                // 自定义验证函数
                                propF: {
                                    validator: function (value) {
                                        // 这个值必须匹配下列字符串中的一个
                                        return ['success', 'warning', 'danger'].indexOf(value) !== -1
                                    }
                                }
        }
        
        1
        2
        3
        4
        5
        6
        7
        8
        9
        10
        11
        12
        13
        14
        15
        16
        17
        18
        19
        20
        21
        22
        23
        24
        25
        26
        27
        28
        29
        30
        31
      2. 子组件触发自定义事件传值

        <!--子组件-->
        <button @click="increment">子组件(点击传值)</button>
        <script>
            export default {
                name: "Son",
                //如果向父组件传递的方法很多,可以在这里标识出来
                //emits 可以是数组或对象,从组件触发自定义事件,emits 可以是简单的数组,也可以是对象,后者允许配置事件验证。
                emits: ['increment'],
                methods: {
                    increment(){
                        this.$emit('increment',2,'第二个参数')//触发自定义事件传值,
                    },
                }
            }
        </script>
        
        1
        2
        3
        4
        5
        6
        7
        8
        9
        10
        11
        12
        13
        14
        15
        <!--父组件-->
        <div id="app">
            {{count}}
            <!--自定义事件,通过$emit触发-->
            <Son @increment="add" />
        </div>
        <script>
            import Son from "./components/Son.vue";
            export default {
                name: "App",
                components: { Son },
                data() {
                    return {
                        count: 0,
                    };
                },
                methods: {
                    add(value, sec) {
                        //触发事件时传的值
                        this.count += value;
                        console.log(value);
                        console.log(sec);
                    },
                },
            };
        </script>
        
        1
        2
        3
        4
        5
        6
        7
        8
        9
        10
        11
        12
        13
        14
        15
        16
        17
        18
        19
        20
        21
        22
        23
        24
        25
        26
      3. 父组件传方法,子组件调用

        <!--父组件-->
        <div id="app">
            {{count}}
            <Son :change="add" />
            <!--传递了add方法,父组件的方法能改变父组件的数据-->
        </div>
        <script>
            import Son from "./components/Son.vue";
            export default {
                name: "App",
                components: { Son },
                data() {
                    return {
                        count: 0,
                    };
                },
                methods: {
                    add(value) {
                        //子组件调用时传值
                        this.count += value;
                        console.log(value);
                    },
                },
            };
        </script>
        
        1
        2
        3
        4
        5
        6
        7
        8
        9
        10
        11
        12
        13
        14
        15
        16
        17
        18
        19
        20
        21
        22
        23
        24
        25
      4. ref 属性

        <!--子组件-->
        <div>子组件</div>
        <script>
            export default {
                name: "Son",
                data(){
                    return {
                        message:'子组件数据',
                    },
                }
        </script>
        
        1
        2
        3
        4
        5
        6
        7
        8
        9
        10
        11
        <!--父组件-->
        <div id="app">
            {{msg}}
            <Son ref="son" />//绑定ref
        </div>
        <script>
            import Son from './components/Son.vue'
            export default {
                name: 'App',
                components: {Son}
                mounted(){
                    this.msg=this.$refs.son.message
                    console.log(this.$refs.son.message)
                    //通过$refs获取组件实例,得到组件数据和方法
                },
                    data(){
                        return{
                            msg:'',
                        }
                    },
        
            }
        </script>
        
        1
        2
        3
        4
        5
        6
        7
        8
        9
        10
        11
        12
        13
        14
        15
        16
        17
        18
        19
        20
        21
        22
        23
      5. slot 插槽

        父组件控制插槽是否显示、怎样显示,子组件控制槽在哪显示(占位符)

        slot写在组件template的什么位置,父组件传过来的模板将来就显示在什么位置。

        <!--父组件-->
        <div id="app">
            父组件
            <Son @change="add">插槽内容:{{msg}}</Son>
            <!--标签内容显示在子组件的<solt>元素位置,插槽内可以包含其他html标签或其它的组件,作用域为父组件作用域,没有<solt>元素则废弃标签内容-->
        </div>
        <script>
            import Son from './components/Son.vue'
            export default {
                name: 'App',
                components: {Son}
                data(){
                    return{
                        msg:'父组件数据',
                    }
                },
        
            }
        </script>
        
        1
        2
        3
        4
        5
        6
        7
        8
        9
        10
        11
        12
        13
        14
        15
        16
        17
        18
        19
        <!--子组件-->
        <div>子组件</div>
        <slot>默认内容</slot>
        <!--父组件什么都不写的话显示默认内容-->
        <!--一个不带name的<slot>出口会带有隐含的名字“default”-->
        <!--任何没有被包裹在带有 v-slot 的 组件标签 中的内容都会被视为默认插槽的内容-->
        <!--v-slot只能添加在<template>上或自定义组件上(只有一种例外情况)-->
        
        1
        2
        3
        4
        5
        6
        7

        具名插槽:< slot name=”mySlot”>有命名时,组件标签中使用属性slot=”mySlot”的元素就会替换该对应位置内容

        <!--父组件-->
        <Son>
            <div slot="header">头部</div>
            <!--标签内部什么都不写显示默认内容-->
            <div slot="content">内容</div>
            <!--新写法`#`为`v-slot:`的缩写-->
            <div #footer>页脚</div>
        </Son>
        
        1
        2
        3
        4
        5
        6
        7
        8
        <!--子组件-->
        <slot name="header">默认内容</slot>
        <slot name="content">默认内容1</slot>
        <slot name="footer">默认内容2</slot>
        
        1
        2
        3
        4

        作用域插槽:子传父传参的方式,解决了普通slot在 parent 中无法访问 child 数据的问题

        父级模板里的所有内容都是在父级作用域中编译的;子模板里的所有内容都是在子作用域中编译的。

        <!--子组件-->
        <h1>子组件</h1>
        <slot :data="list" name="son">{{def}}</slot>
        <!--子组件把list传递给插槽,不写name,name为fefault-->
        <script>
            export default {
                name: "Son",
                data(){
                    return {
                        def:'默认内容',
                        list: [
                            "起源与终结的序章","时空跳跃的妄想症",
                            "并列过程的偏执狂","空理彷徨的会谈",
                            "电荷冲突的接点","蝶翼的偏差值",
                            "断层的变动率","梦幻的自平衡",
                            "时空境界的信条","自我相似的雌性同株",
                            "形而上的坏死","虚像歪曲的混合",
                            "因果律的溶解","镜面上的命运石之门"
                        ],
                    },
                }
        </script>
        
        1
        2
        3
        4
        5
        6
        7
        8
        9
        10
        11
        12
        13
        14
        15
        16
        17
        18
        19
        20
        21
        22
           <!--父组件-->
         <Son>
             <template #son="prop">
               <!--父组件使用一个变量来接收,这里变量为prop(随便取名),也可以解构{list},prop作为参数传入函数-->
               <li v-for="(v,i) in prop.list" :key="i">{{v}}</li>
             </template>
           </Son>
        
        1
        2
        3
        4
        5
        6
        7

        https://juejin.cn/post/6954284127528943629

        http://www.jianboge.com/d148386


    # 动态组件 & 异步组件

    • 动态组件:通过动态属性is结合component标签实现,<component /:is="xxxx" />,通常和keep-alive一起使用保持组件状态,is的值为组件名、组件对象或函数式组件。

      Component1
      Component2
      Component1
      Component1
      <div>
          <div v-for="(v, i) in list" :key="i">
              <component :is="v.type" />
          </div>
      </div>
      <script>
          const Component1 = {
              render(h) {
                  return <span>Component1</span>;
              },
          };
          const Component2 = {
              render(h) {
                  return <span>Component2</span>;
              },
          };
          export default {
              data() {
                  return {
                      list: [
                          { type: "Component1" },
                          { type: "Component2" },
                          { type: "Component1" },
                          { type: "Component1" },
                      ],
                  };
              },
              components: {
                  Component1,
                  Component2,
              },
          };
      </script>
      
      1
      2
      3
      4
      5
      6
      7
      8
      9
      10
      11
      12
      13
      14
      15
      16
      17
      18
      19
      20
      21
      22
      23
      24
      25
      26
      27
      28
      29
      30
      31
      32
      33
      显示代码 复制代码
      <!--缓存组件(子组件为input)-->
      <!--使用keep-alive缓存组件状态,切换时input框输入的内容还存在-->
      <div>
          <keep-alive>
              <component :is="com" />
          </keep-alive>
          <el-button @click="change">change</el-button>
      </div>
      <script>
          const Component1 = {
              data() {
                  return {
                      value: "Component1",
                  };
              },
              render(h) {
                  return <input v-model={this.value} />;
              },
          };
          const Component2 = {
              data() {
                  return {
                      value: "Component2",
                  };
              },
              render(h) {
                  return <input v-model={this.value} />;
              },
          };
          export default {
              data() {
                  return {
                      com: "Component1",
                  };
              },
              components: { Component1, Component2 },
              methods: {
                  change() {
                      this.com === "Component1"
                          ? (this.com = "Component2")
                      : (this.com = "Component1");
                  },
              },
          };
      </script>
      
      1
      2
      3
      4
      5
      6
      7
      8
      9
      10
      11
      12
      13
      14
      15
      16
      17
      18
      19
      20
      21
      22
      23
      24
      25
      26
      27
      28
      29
      30
      31
      32
      33
      34
      35
      36
      37
      38
      39
      40
      41
      42
      43
      44
      45
      显示代码 复制代码
    • 异步组件:异步执行某些组件逻辑,加载页面时会下载所有组件代码,异步组件类似路由懒加载(按需加载),优化性能。

      <!--基本使用-->
      <div id="app">
        异步组件的使用
        <button @click="show=!show">{{show?'隐藏':'显示'}}</button>
        <Son v-if="show" />
      </div>
      <script>
            import Son from './components/Son.vue'
            export default {
                name: 'App',
                components: {
                    Son:()=>(import(/*webpackChunkName:'Son'*/'./components/Son.vue')),
        //当show为true时才加载js代码并缓存代码,webpackChunkName可以给该js文件取名
                }
                data(){
                    return{
                        show: false,
                  }
                },
      
            }
       </script>
      
      1
      2
      3
      4
      5
      6
      7
      8
      9
      10
      11
      12
      13
      14
      15
      16
      17
      18
      19
      20
      21
      22
      <!--异步组件工厂函数-->
      <div id="app">
          异步组件的使用
          <button @click="show=!show">{{show?'隐藏':'显示'}}</button>
          <AsyncComponent v-if="show" />
      </div>
      <script>
          import Error from './components/Error.vue'
          import Loading from './components/Loading.vue'
          import Son from './components/Son.vue'
          //异步组件工厂函数
          const AsyncComponent=()=>({
              component:import (/*webpackChunkName:'Son'*/'./components/Son.vue'),//promise对象
              loading:Loading,
              error:Error,
              delay:200,//延迟200ms(先显示loading组件)
              timeout:3000//超过3000ms显示error组件
          })
          export default {
              name: 'App',
              components: {
                  AsyncComponent
              }
              data(){
                  return{
                      show: false,
                  }
              },
      
          }
      </script>
      
      1
      2
      3
      4
      5
      6
      7
      8
      9
      10
      11
      12
      13
      14
      15
      16
      17
      18
      19
      20
      21
      22
      23
      24
      25
      26
      27
      28
      29
      30
      31

      vue3 使用辅助函数defineAsyncComponent声明,component 选项更名为loader,选项可以添加onErorr回调重试

    • 动态异步组件

      //组件对象
      const loading = {
          name: "loading",//keep-alive排除组件
          template:
          '<div >加载中....</div>',
      };
      const error = {
          name: "error",
          template:
          '<div >加载错误</div>',
          inject: ["reload"],
          created() {
              this.reload && this.reload(); //重试
          },
      };
      const component = {
          template:
          '<div >I am async!</div>',
      };
      
      1
      2
      3
      4
      5
      6
      7
      8
      9
      10
      11
      12
      13
      14
      15
      16
      17
      18
      19
      <keep-alive :exclude="['error', 'loading']">
          <!-- keep-alive需要排除error,loading组件-->
          <component
                     :is="AsyncComponent"
                     ></component>
      </keep-alive>
      <script>
          export default {
              data() {
                  return {
                      attempts: 0,
                      isGetCom: false,
                  }
              },
              computed: {
                  AsyncComponent(){
                      return () => ({
                          component: new Promise((resolve) => {
                              setTimeout(() => {
                                  resolve(component);
                              }, 1500);
                          }),
                          error,
                          loading,
                          delay: 0,
                          timeout: 1000,
                      })
                  }
              },
          }
      </script>
      
      1
      2
      3
      4
      5
      6
      7
      8
      9
      10
      11
      12
      13
      14
      15
      16
      17
      18
      19
      20
      21
      22
      23
      24
      25
      26
      27
      28
      29
      30
      31
    • 异步组件失败解决

      <!--method1:利用key刷新父组件-->
      <async-com :key="attempts" />
      <script>
          //vm.$forceUpdate()可以迫使 Vue 实例重新渲染。注意它仅仅影响实例本身和插入插槽内容的子组件,而不是所有子组件。
          //重要提示:这不会更新任何计算属性,调用`forceUpdate`仅仅强制重新渲染视图。
          import AsyncCom from "./components/AsyncCom.vue";
          export default {
              data() {return {
                  attempts: 0,
                  //key放动态组件上会因为timeou时间已过导致无限循环
              };
                     },
              provide: function () {
                  return {
                      reload: this.reload,
                      //error组件中调用
                  };
              },
              methods: {
                  reload() {
                      if (this.attempts < 10) console.log("尝试次数", ++this.attempts);
                  },
              },
              components: {
                  AsyncCom,
              },
      </script>
      
      1
      2
      3
      4
      5
      6
      7
      8
      9
      10
      11
      12
      13
      14
      15
      16
      17
      18
      19
      20
      21
      22
      23
      24
      25
      26
      27
      <!--method2:更新计算属性的依赖项更新计算属性,导致视图更新-->
      <script>
          export default {
              data() {return {
                  attempts: 0,
              }},
              computed: {
                  AsyncComponent() {
                      return () => ({
                          component, error,loading, delay: 0,timeout: 1000,
                          attempts: this.attempts,
                      })
                  }
              },
              methods: {
                  reload() {
                      if (this.attempts < 10) {
                          //与方法1类似error组件调用
                          console.log("尝试次数", ++this.attempts);
                      }
                  },
              }
          }
      </script>
      
      1
      2
      3
      4
      5
      6
      7
      8
      9
      10
      11
      12
      13
      14
      15
      16
      17
      18
      19
      20
      21
      22
      23
      24
      <!--method3:获取组件后更新计算属性-->
      <script>
          let component//使用变量保存组件
          export default {
              data() {
                  return {
                      isGetCom: false,//改变依赖触发计算属性更新
                  }
              },
              computed: {
                  AsyncComponent() {
                      if (!this.isGetCom) 
                          return () => ({
                              component: new Promise((resolve) => {
                                  setTimeout(() => {
                                      const com={
                                          template:'<div>I am async!</div>',
                                      };
                                      component=com
                                      this.isGetCom=true//计算属性重新计算     
                                      //resolve(this.component);
                                  }, 1500);
                              }),
                              error,
                              loading,
                              delay: 0,
                              timeout: 1000,
                          });
                      else return component;
                  },
              }}
      </script>
      
      1
      2
      3
      4
      5
      6
      7
      8
      9
      10
      11
      12
      13
      14
      15
      16
      17
      18
      19
      20
      21
      22
      23
      24
      25
      26
      27
      28
      29
      30
      31
      32

    # Mixin 混入

    • 提取组件公共逻辑(包含任意组件选项如 data,mehoods,生命周期)

      //定义minin
      export default {
          data() {
              return {
                  dataCommomd: "公共数据",
              };
          },
          methods: {
              methodsCommomd() {
                  console.log(this.type + "公共方法");
              },
          },
          mounted() {
              console.log("公共mounted");
          },
      };
      
      1
      2
      3
      4
      5
      6
      7
      8
      9
      10
      11
      12
      13
      14
      15
      16
      <!--子组件A(组件B类似)-->
      <template>
      <div>
          <button @click="methodsA">
              组件A方法
          </button>
          <button @click="methodsCommomd">
              公共方法
          </button>
          </div>
      </template>
      <script>
          import mixin from './mixin'
          export default {
              mixins:[mixin],
              data(){
                  return{
                      aData:'组件A的数据',
                      type:"组件A"
                  }
              },
              methods: {
                  methodsA(){
                      console.log("组件A的方法")
                  }
              },
              mounted(){
                  console.log('组件A的mounted')
                  console.log(this.type+this.dataCommomd)
              }
          }
      </script>
      
      1
      2
      3
      4
      5
      6
      7
      8
      9
      10
      11
      12
      13
      14
      15
      16
      17
      18
      19
      20
      21
      22
      23
      24
      25
      26
      27
      28
      29
      30
      31
      32
      <!--父组件-->
      <div id="app">
        <h1>Minin的使用</h1>
        <component-a />
        <hr />
        <component-b />
      </div>
      <script>
        import componentA from "./components/ComponentA.vue";
        import componentB from "./components/ComponentB.vue";
        export default {
          name: "App",
          components: {
            "component-a": componentA,
            "component-b": componentB,
          },
          data() {
            return {};
          },
        };
      </script>
      
      1
      2
      3
      4
      5
      6
      7
      8
      9
      10
      11
      12
      13
      14
      15
      16
      17
      18
      19
      20
      21
    • 优先级

      1. 数据和方法:组件 data ,methods 优先级高于 mixin data,methods 优先级
      2. 生命周期:生命周期函数,先执行 mixin 里面的,再执行组件里的
      3. 自定义的属性,组件中的属性优先级高于 mixin 属性的优先级
    • 其他

      1. 局部Mixin:mixins:[myMixin],myMixin 是一个自定义组件
      2. 全局 Mixin:app.mixin( )
      3. Vue3中尽量避免使用Mixin,因为可以使用 CompositionAPI 来代替,可维护性更高。

    # extends


    # 依赖注入

    祖先组件使用provide选项向后代提供数据/方法,后代组件通过inject 选项接收propertyproperty是非响应式的。

    <!--祖先组件-->
    <Son />
    <script>
        import Son from "./components/Son";
        const store = Vue.observable({ name: "张三" });
        export default {
            data() {
                return {
                    msg: "Some people choose to see the ugliness in this world.The disarray.I choose to see the beauty",
                    obj:{name:'dax1'},//同样是响应的
                };
            },
            provide: function () {//对象或返回一个对象的函数
                this.store = store;
                return {
                    store: this.store,//如果你传入了一个可监听的对象,那么其对象的 property 还是可响应的
                    msg: this.msg,
                    parent: this, //当前组件实例
                };
            },
            mounted() {
                this.store.name = "李四";
            },
            components: {
                Son,
            },
        };
    </script>
    
    1
    2
    3
    4
    5
    6
    7
    8
    9
    10
    11
    12
    13
    14
    15
    16
    17
    18
    19
    20
    21
    22
    23
    24
    25
    26
    27
    28
    <!--后代组件-->
    <div>{{this.msg}}</div>
    <script>
      export default {
        inject: ["msg", "parent"],//一个字符串数组,或一个对象
        mounted() {
          console.log(this.parent);
        },
      };
    </script>
    
    1
    2
    3
    4
    5
    6
    7
    8
    9
    10

    # 事件总线

    • vue2

      //定义eventbus
      //event-bus.js
      import Vue from "vue";
      export const eventBus = new Vue(); //eventBus就是一个Vue实例
      
      1
      2
      3
      4
      <!--组件1-->
      {{ age }}
      <el-button @click="add">加1</el-button>
      <script>
        import { eventBus } from "./event-bus.js"; //需要是同一个eventBus
        export default {
          data() {
            return {
              age: 18,
            };
          },
          methods: {
            add() {
              this.age++;
              eventBus.$emit("add-age"); //发送消息
            },
          },
        };
      </script>
      
      1
      2
      3
      4
      5
      6
      7
      8
      9
      10
      11
      12
      13
      14
      15
      16
      17
      18
      19
      <!--组件2-->
      {{ age }}
      <el-button @click="add">加1</el-button>
      <script>
          import { eventBus } from "./event-bus.js";
          export default {
              data() {
                  return { age: 18 }
              },
              methods: {
                  add() {
                      this.age++;
                  },
              },
              created() {
                  eventBus.$on("add-age", () => {
                      this.age++;
                  }); //接收消息
              },
              beforeDestroy() {
                  // 如果没有提供参数,则移除所有的事件监听器;
                  // 如果只提供了事件,则移除该事件所有的监听器;
                  // 如果同时提供了事件与回调,则只移除这个回调的监听器。
                  eventBus.$off("add-age", () => {
                      this.age++;
                  });
              },
          };
      </script>
      
      1
      2
      3
      4
      5
      6
      7
      8
      9
      10
      11
      12
      13
      14
      15
      16
      17
      18
      19
      20
      21
      22
      23
      24
      25
      26
      27
      28
      29
    • vue3

      //使用mitt
      import mitt from 'mitt'
      app.config.globalProperties.$bus = mitt();
      
      1
      2
      3
      <!--组件1触发-->
      <script lang="ts" setup>
          import { getCurrentInstance } from "vue";
          const { proxy } = getCurrentInstance();
          function emit() {
              proxy.$bus.emit('message',{msg:'北海虽赊,扶摇可接'})
          }
      </script>
      
      1
      2
      3
      4
      5
      6
      7
      8
      <!--组件2监听-->
      <script lang="ts" >
         created() {
          this.$bus.on('search',(e:Object)=>{
              console.log(e);
          })
        },
      </script>
      
      1
      2
      3
      4
      5
      6
      7
      8

    # directive

    • 定义方法

      1. 全局:app.directive('focus',{mounted(el){el.focus()}})

      2. 局部:局部指令需要在父组件注册后才可以使用

        directives: { focus: { // 指令的定义 inserted: function (el) { el.focus() } } }

      //navActive.js
      export default {
        //指令就是对象
        bind: (el, bind) => {
          // console.log('bind')
          // console.log(el) el为指令绑定的dom元素
          // console.log(bind); bind.value可以拿到绑定指令传的值
          el.onclick = () => {
            //点击更改样式变红,获取父元素把重置兄弟元素样式
            el.className = "el-button el-button--danger";
            const children = Array.from(el.parentNode.children);
            children.forEach((v, i) => {
              if (i !== bind.value.index)
                v.className = "el-button el-button--default";
            });
          };
        },
      };
      
      1
      2
      3
      4
      5
      6
      7
      8
      9
      10
      11
      12
      13
      14
      15
      16
      17
      18
      <div>
        <!--3个按钮,指令传index,bing.value获取-->
        <el-button v-nav-active="{index:i}" v-for="(v,i) in 3" :key="i"
          >按钮{{v}}</el-button
        >
      </div>
      <script>
        import NavActive from "./navActive.js";
        export default {
          name: "Son",
          directives: {
            NavActive, //注册指令
          },
          data() {
            return {};
          },
        };
      </script>
      
      1
      2
      3
      4
      5
      6
      7
      8
      9
      10
      11
      12
      13
      14
      15
      16
      17
      18
    • 生命周期函数


    # 渲染函数

    字符串模板之外的另一种选择,允许你充分利用 JavaScript 的编程功能。

    <!-- 不加:会解析为string类型 -->
    <Son :leave=1>黄金色的树林里分出两条路,</Son>
    <Son :leave=2>可惜我们不能同时去涉足,</Son>
    <Son :leave=3>但我们却选择了,</Son>
    <Son :leave=4>人迹罕至的那一条,</Son>
    <Son :leave=5>这从此决定了</Son>
    <Son :leave=6>我们的一生。</Son>
    
    1
    2
    3
    4
    5
    6
    7
    <p :style="`font-size:${fontSize}`"><slot/></p>
    <script>
        export default {
            name: "Son",
            props: ["leave"],
            computed: {
                fontSize: function () {
                    if (this.leave % 2) {
                        return 10 + (6 - this.leave) * 3 + "px";
                    } else {
                        return 10 + (6 - this.leave) * 2 + "px";
                    }
                },
            },
        };
    </script>
    
    1
    2
    3
    4
    5
    6
    7
    8
    9
    10
    11
    12
    13
    14
    15
    16

    使用render函数创建标签

    黄金色的树林里分出两条路,

    可惜我们不能同时去涉足,

    但我们却选择了,

    人迹罕至的那一条,

    这从此决定了
    我们的一生。
    <div>
        <Son :leave="1">黄金色的树林里分出两条路,</Son>
        <Son :leave="2">可惜我们不能同时去涉足,</Son>
        <Son :leave="3">但我们却选择了,</Son>
        <Son :leave="4">人迹罕至的那一条,</Son>
        <Son :leave="5">这从此决定了</Son>
        <Son :leave="6">我们的一生。</Son>
    </div>
    <script>
        const Son = {
            name: "Son",
            props: ["leave"],
            render(h) {
                //h是createlement函数
                return h(`h${this.leave}`, this.$slots.default);
                // 或使用jsx语法
                // const tag = "h" + this.leave;
                // return (<tag>{this.$slots.default}</tag>);
            },
        };
        export default {
            name: "Test",
            components: { Son },
        };
    </script>
    
    1
    2
    3
    4
    5
    6
    7
    8
    9
    10
    11
    12
    13
    14
    15
    16
    17
    18
    19
    20
    21
    22
    23
    24
    25
    显示代码 复制代码
    • 岁月流转,念念不忘,群碑未成,来日方长 
    • 日斜映影渐薄,犹待来者,重托衣钵 
    • 她实惠君良多,更有无穷,待君探索 
    • 此路或有蹉跎,君莫忘,必有灵犀相佐
    <script> 
        export default {
            data() {
                return {
                    list: [
                        "岁月流转,念念不忘,群碑未成,来日方长 ",
                        "日斜映影渐薄,犹待来者,重托衣钵 ",
                        "她实惠君良多,更有无穷,待君探索 ",
                        "此路或有蹉跎,君莫忘,必有灵犀相佐",
                    ],
                };
            },
            props: {
                tag: { type: String, default: "ul" },
            },
            render(h) {
                //使用template也会被编译为render函数
                return h(
                    this.tag, //也可以是一个组件
                    {},
                    this.list.map((i) => {
                        return h("li", { attrs: { style: "color:skyblue" } }, i); //需要return一个value
                    })
                );
            },
        };
    </script> 
    
    1
    2
    3
    4
    5
    6
    7
    8
    9
    10
    11
    12
    13
    14
    15
    16
    17
    18
    19
    20
    21
    22
    23
    24
    25
    26
    27
    显示代码 复制代码

    # Vue-Router路由

    安装:Vue add router

    • 根据 URL 的不同,展示不同的内容

      //route/index.js文件
      import Vue from "vue";
      import Router from "vue-router";
      import layout from "../components/Layout.vue";
      import Son from "../components/Son.vue";
      import notFond from "../components/NotFond.vue";
      Vue.use(Router); //使用插件
      //该插件实现1.声明并全局注册router-link与router-view2.实现install:this.$router.push()
      export default new Router({
        //创建实例
        mode: "history", //路由模式,默认hash,history无#
        base: process.env.BASE_URL,
        //配置路由表(路由规则)
        routes: [
          {
            path: "/",
            name: "home",
            component: layout,
          },
          {
            path: "son",
            name: "son",
            component: Son,
          },
          {
            path: "*",
            name: "notFond",
            component: notFond,
          },
        ],
      });
      //匹配到path路径后找对应的component组件,在'router-view'处渲染
      //匹配不到路径渲染notFond组件
      
      1
      2
      3
      4
      5
      6
      7
      8
      9
      10
      11
      12
      13
      14
      15
      16
      17
      18
      19
      20
      21
      22
      23
      24
      25
      26
      27
      28
      29
      30
      31
      32
      33
      //还需要在main.js中将路由实例挂载给Vue实例
      import router from "./router/index.js";
      new Vue({ router, render: (h) => h(App) }).$mount("#app"); //添加配置项
      
      1
      2
      3
      <!--app.vue一级路由匹配到的组件将显示在路由出口-->
      <template>
        <router-view></router-view>
      </template>
      
      1
      2
      3
      4
    • 动态路由

      路由传参,通过 route.param 接收

      //路由index.js
      import Vue from "vue";
      import Router from "vue-router";
      const routes = [
        {
          path: "/",
          name: "home",
          component: layout,
          children: [
            {
              path: "/login",
              name: "login",
              component: Login,
            },
            {
              path: "/reg",
              name: "reg",
              component: Reg,
            },
            //动态路由,参数名为id
            {
              path: "/user/:id",
              name: "user",
              component: User,
            },
          ],
        },
        {
          path: "*",
          name: "notFond",
          component: notFond,
        },
      ];
      Vue.use(Router);
      export default new Router({
        mode: "history",
        base: process.env.BASE_URL,
        routes,
      });
      //解决重复点击报错
      const originalPush = Router.prototype.push;
      Router.prototype.push = function push(location) {
        return originalPush.call(this, location).catch((err) => err);
      };
      
      1
      2
      3
      4
      5
      6
      7
      8
      9
      10
      11
      12
      13
      14
      15
      16
      17
      18
      19
      20
      21
      22
      23
      24
      25
      26
      27
      28
      29
      30
      31
      32
      33
      34
      35
      36
      37
      38
      39
      40
      41
      42
      43
      44
      <!--user组件-->
      <template>
        <div>用户信息{{id}}</div>
      </template>
      <script>
        export default {
          data() {
            return {
              id: this.$route.params.id,
              //直接这么写页面上的id并不会变化,路由变化并不会重新创建组件,id是初始化的时候赋值的所以不会改变
            };
          },
          watch: {
            //监听路由或使用组件内路由守卫改变id
            $route(n, o) {
              this.id = n.params.id;
              console.log(o);
            },
          },
        };
      </script>
      
      1
      2
      3
      4
      5
      6
      7
      8
      9
      10
      11
      12
      13
      14
      15
      16
      17
      18
      19
      20
      21
    • 嵌套路由

      //重新定义路由表
      routes: [
          {
              path: "/",
              name: "home",
              component: layout,
              children: [
                  {
                      path: "/login",
                      name: "login",
                      component: Login,
                  },
                  {
                      path: "/reg",
                      name: "reg",
                      component: Reg,
                  },
              ],
          },
          {
              path: "*",
              name: "notFond",
              component: notFond,
          },
      ],
      
      1
      2
      3
      4
      5
      6
      7
      8
      9
      10
      11
      12
      13
      14
      15
      16
      17
      18
      19
      20
      21
      22
      23
      24
      25
      <el-container>
        <el-aside width="200px">Aside</el-aside>
        <el-container>
          <el-header>Header</el-header>
          <el-main
            >Main
            <!--点击跳转路由切换router-view内容-->
            <router-link to="/login">登录</router-link>
            <router-link to="reg">注册</router-link>
            <!--二级路由将显示在这-->
            <router-view></router-view>
          </el-main>
          <el-footer>Footer</el-footer>
        </el-container>
      </el-container>
      <!--配合element的Container布局容器-->
      
      1
      2
      3
      4
      5
      6
      7
      8
      9
      10
      11
      12
      13
      14
      15
      16
    • 动态添加路由

      <el-container>
          <el-aside width="200px">Aside</el-aside>
          <el-container>
              <el-header>Header</el-header>
              <el-main
                       >Main
                  <a @click="login">登录</a>
                  <router-link to="/reg">注册</router-link>
                  <router-link to="/new" v-if="isLogin">动态添加的路由</router-link>
                  <router-view></router-view>
              </el-main>
              <el-footer>Footer</el-footer>
          </el-container>
      </el-container>
      <script>
      import New from "./New"; //新路由
      const newRouter = [
        {
          path: "/new",
          component: New,
        },
      ];
      export default {
        data() {
          return {
            isLogin: false,
          };
        },
        methods: {
          login() {
            this.isLogin = true;
            this.$router.push("/login");
            this.$router.addRoutes(newRouter);
          },
        },
      };
      </script>
      
      1
      2
      3
      4
      5
      6
      7
      8
      9
      10
      11
      12
      13
      14
      15
      16
      17
      18
      19
      20
      21
      22
      23
      24
      25
      26
      27
      28
      29
      30
      31
      32
      33
      34
      35
      36
      37

      addRoutes添加的路由为一级路由,,如果是二级路,那要把父路由、祖先路由也带上,否则不会识别。vue3改用 router.addRoute,可以添加一条新的路由规则记录作为现有路由的子路由。

    • 导航守卫

      路由守卫用于路由跳转的一些验证

      1. 全局守卫:前置守卫:beforeEach 后置钩子:afterEach

      2. 单个路由守卫:独享守卫:beforeEnter

      3. 组件内部守卫:beforeRouteEnter beforeRouteUpdate beforeRouteLeave

      4. 所有的路由守卫都是三个参数(to,from,next)

        to: 要进入的目标路由(去哪儿)

        from: 要离开的路由(从哪来)

        next: 是否进行下一步(要不要继续)

      5. next()相当于 next(true) 放行,不写 相当于next(false)终止执行,next(path)跳转 例如:next("/login"),注意:后置钩子afterEach没有next参数

      //main.js中设置全局路由前置守卫
      import router from "./router/index.js";
      // eslint-disable-next-line //忽略下行eslint校验
      const login = false;
      router.beforeEach((to, from, next) => {
        if (to.path !== "/user") next();
        //如果不去/user路由,放行
        else {
          if (login == true) {
            //如果登录,放行
            next();
          } else {
            //未登录跳转'/login'路由
            next("/login");
          }
        }
      });
      
      1
      2
      3
      4
      5
      6
      7
      8
      9
      10
      11
      12
      13
      14
      15
      16
      17
      //路由独享的守卫(进入这个路由之前)
      {
          path: "/user",
              name: "user",
                  component: User,
                      // eslint-disable-next-line
                      beforeEnter: (to, from, next) => {
                          if (to.path !== "/user") next();
                          else {
                              if (login == true)  next();
                              else  next("/login");
      
                          }
                      },
      },
      
      1
      2
      3
      4
      5
      6
      7
      8
      9
      10
      11
      12
      13
      14
      15
      <!--组件内的守卫-->
      <div>用户信息</div>
      <script>
        const login = false;
        export default {
          data() {
            return {
              login: true,
              //不!能!获取组件实例 `this`,因为当守卫执行前,组件实例还没被创建
              //可以通过next(vm => {// 通过 `vm` 访问组件实例})
              //beforeRouteUpdate 和 beforeRouteLeave 来说,this 已经可用了,所以不支持传递回调
            };
          },
          beforeRouteEnter(to, from, next) {
            // eslint-disable-next-line
            if (login == true) next();
            else next("/login");
          },
        };
      </、script>
      
      1
      2
      3
      4
      5
      6
      7
      8
      9
      10
      11
      12
      13
      14
      15
      16
      17
      18
      19
      20
    • api

      $router全局对象

      push(path)

      replace(path)

      back()

      go(-1/1...)

      $route当前路由对象

      params

      query

      path

      name(路由表中定义)

    • 其他

      1. Home 模板中使用的路由跳转标签
      2. 标签, 负责展示当前路由对应的组件内容
      3. 异步加载路由:component:( ) => import('../xxxx')

      4. 命名路由搭配 params,刷新页面参数会丢失

        this.$router.push({ name: "news", params: { userId: 123 } });
        
        1

        查询参数搭配 query,刷新页面数据不会丢失

        this.$router.push({ path: "/news", query: { userId: 123 } });
        
        1

    # vue-route原理 (opens new window)

    Vue.use(Router); //Router是插件,插件是函数或对象
    // var a=function(){//第一个参数是vue构造函数
    //console.log(vue);
    //      console.log("function")
    // }
    var a = {};
    a.install = function (vue) {
      //install方法的第一个参数是vue构造函数
      console.log(vue);
      console.log("install");
    };
    Vue.use(a); //use时会执行a中的代码,如果a有install属性,则执行install方法
    
    1
    2
    3
    4
    5
    6
    7
    8
    9
    10
    11
    12
    //vueRoute.js
    let Vue;
    class VueRoute {
        constructor(options) {
            // console.log(options);
            // this.current = "/";
            Vue.util.defineReactive(this, "current", "/"); //将current实现响应式
            console.log(this.current);
            this.routes = options.routes; //用户定义路由表
            this.modes = options.mode || "hash";
            this.init(); //监听路由改变
            this.push = () => {}; //...
        }
        init() {
            if (this.modes === "hash") {
                //第一次加载
                window.addEventListener("load", () => {
                    this.current = location.hash.slice(1);
                });
                //地址栏改变时
                window.addEventListener("hashchange", () => {
                    //通过hashchange监听
                    this.current = location.hash.slice(1);
                });
            } else {
                //处理history
                //利用了 HTML5 History Interface 中新增的 pushState() 和 replaceState() 方法结合window.popstate事件(监听浏览器前进后退)。
                window.addEventListener('popstate',()=>{
                })
            }
        }
    }
    VueRoute.install = (_vue) => {
        Vue = _vue; //保存Vue
        //创建全局组件
        Vue.component("router-link", {
            props: {
                to: {
                    //使用组件需要传href
                    type: String,
                    require: true,
                },
            },
            render(h) {
                //创建html标签,router-link避免了重复渲
                return h("a", { attrs: { href: "#" + this.to } }, this.$slots.default);
            },
        });
        Vue.component("router-view", {
            render(h) {
                //变量为响应式的才执行
                const { current, routes } = this.$router;
                const com = routes.find((item) => item.path == current);
                //console.log("com", com);
                return h(com.component);
            },
        });
        //全局混入,给vue原型添加router属性
        Vue.mixin({
            beforeCreate() {
                if (this.$options.router) {
                    //根实例
                    Vue.prototype.$router = this.$options.router; //给vue原型添加$router属性
                }
            },
        });
    };
    export default VueRoute;
    
    1
    2
    3
    4
    5
    6
    7
    8
    9
    10
    11
    12
    13
    14
    15
    16
    17
    18
    19
    20
    21
    22
    23
    24
    25
    26
    27
    28
    29
    30
    31
    32
    33
    34
    35
    36
    37
    38
    39
    40
    41
    42
    43
    44
    45
    46
    47
    48
    49
    50
    51
    52
    53
    54
    55
    56
    57
    58
    59
    60
    61
    62
    63
    64
    65
    66
    67
    68

    # 插件

    • 对象形式

      const obj = {
          install: function (app:any, options1:any,option2:any) {
              console.log("使用插件");
              console.log('app',app);
              console.log(options1,option2);
          }
      }
      app.use(obj,'option1','option2')//执行install方法,
      
      1
      2
      3
      4
      5
      6
      7
      8
    • 函数形式

      const fun=function(app:any,opt1:any){
          console.log(app);
          console.log(opt1);
          
      }
      app.use(fun,'option1')//执行函数
      
      1
      2
      3
      4
      5
      6

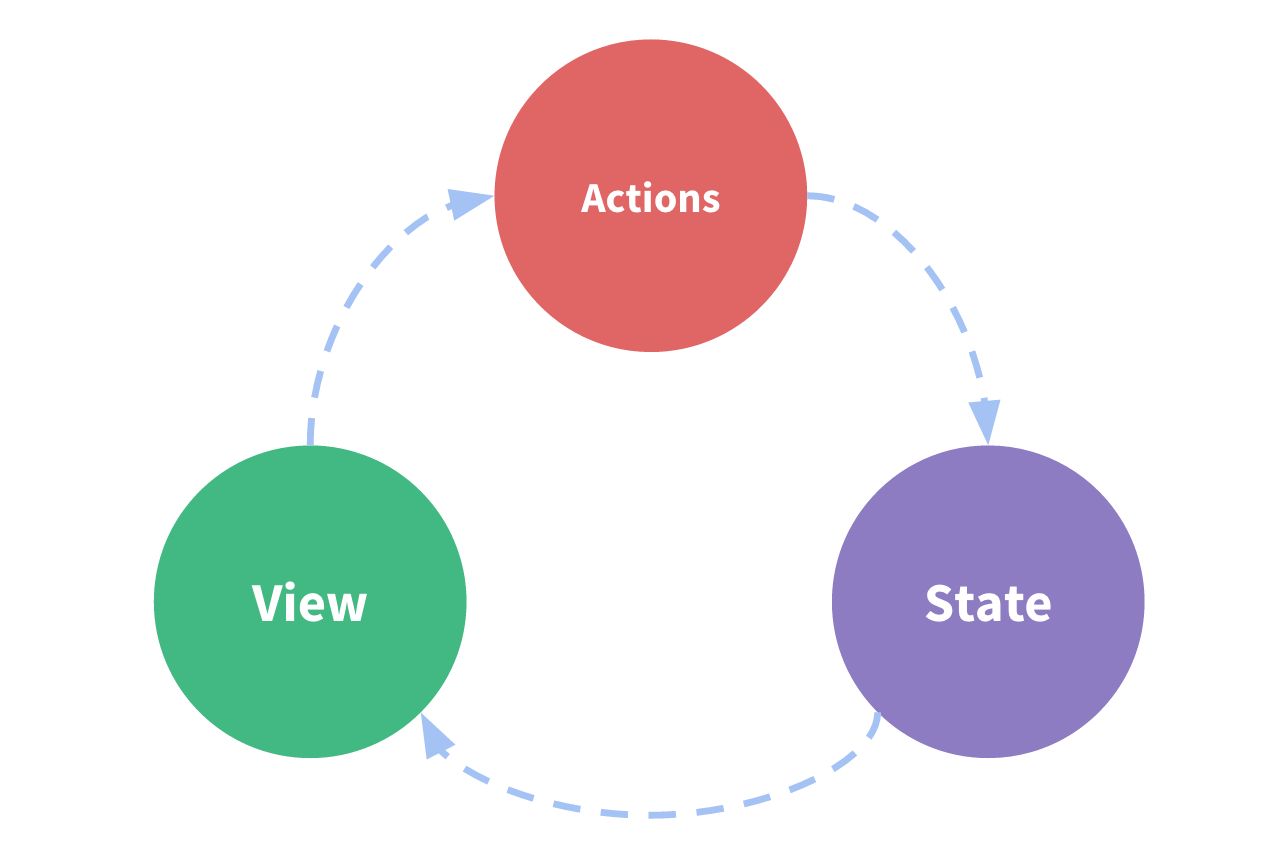
    # VueX (opens new window)

    • 单向数据流

      单向数据流
    • Vuex数据管理框架,VueX 创建了一个全局唯一的仓库,用来存放全局的数据。

      //基本使用(vue add vuex)
      //创建store下的index.js文件
      import Vue from "vue";
      import Vuex from "vuex";
      
      Vue.use(Vuex);
      //创建VueX对象
      export default new Vuex.Store({
        state: {
          //存放要管理的状态
          count: 0,
          list: [
            { tilie: "昔我往矣 (Wake up from the past)", time: "0:28" },
            { tilie: "镜花水月 (The mirror)", time: "0:55" },
            { tilie: "谁解其中味 (The secret)", time: "1:00" },
            { tilie: "夜来幽梦 (Wake up)", time: "0:26" },
            { tilie: "零落成泥 (Dust to dust)", time: "1:36" },
            { tilie: "在水一方 (Where is she)", time: "1:38" },
          ],
        },
        mutations: {
          //这里是set方法
          increment(state, payload) {
            state.count += payload;
          },
          decrement(state, payload) {
            state.count -= payload;
          },
        },
        actions: {
          //异步操作
          async({ commit }) {
            //Actions接受一个context对象参数,该参数具有和store实例相同的属性和方法
            setTimeout(() => {
              commit("increase", 3);
            }, 1000);
          },
        },
        getters: {
          // 这里是get方法
          newList(state) {
            state.list.push({
              tilie: "送别 (Farewell by Ms.Chen)",
              time: "1:00",
            });
            return state.list;
          },
        },
      });
      
      1
      2
      3
      4
      5
      6
      7
      8
      9
      10
      11
      12
      13
      14
      15
      16
      17
      18
      19
      20
      21
      22
      23
      24
      25
      26
      27
      28
      29
      30
      31
      32
      33
      34
      35
      36
      37
      38
      39
      40
      41
      42
      43
      44
      45
      46
      47
      48
      49
      //需要在根实例中注册 store 选项,该 store 实例会注入到根组件下的所有子组件中,且子组件能通过 this.$store 访问到
      import store from "./store/index";
      new Vue({ store, render: (h) => h(App) }).$mount("#app");
      //挂载
      
      1
      2
      3
      4
      <!--子组件-->
      <template>
        <div>
          <!--添加对多个参数不能直接加',',否则第二个参数是undifined,应该封装成对象或数组-->
          <el-button @click="$store.commit('increment', 2)">加2</el-button>
          <el-button @click="$store.commit('decrement', 2)">减2</el-button>
          总数:{{ $store.state.count }}
        </div>
      </template>
      <script>
        export default {
          name: "Son",
          data() {
            return {
              //count:this.$store.state.count
              //这么写改变数据时页面不更新
            };
          },
        };
      </>
      
      1
      2
      3
      4
      5
      6
      7
      8
      9
      10
      11
      12
      13
      14
      15
      16
      17
      18
      19
      20
    • 核心内容

      1. state 存放状态
      2. mutations state 成员操作commit(‘mutation’,paylod)
      3. getters 加工 state 成员给外界
      4. actions 异步操作dispatch(‘action’,paylod)
      5. modules 模块化状态管理
    • 增删 state 中的成员

      //使用delete或者xx.xx = xx的形式去删或增,则Vue不能对数据进行实时响应。
      Vue.set(state, "age", 15); //添加
      Vue.delete(state, "age"); //删除
      
      1
      2
      3
    • 辅助函数

      <!--子组件-->
      <el-button @click="increase(2)">加2</el-button>
      <!-- {{ $store.state.count }} -->
      {{count}}
      <el-button @click="decrease(2)">减2</el-button>
      <el-button @click="async">async</el-button>
      <el-table :data="newList" style="width: 30%" class="table">
        <el-table-column type="index" label="编号" width="50"> </el-table-column>
        <el-table-column prop="tilie" label="曲目列表(中/英)" width="250">
        </el-table-column>
        <el-table-column prop="time" label="时长"> </el-table-column>
      </el-table>
      <script>
        import { mapState, mapGetters, mapMutations } from "vuex";
        export default {
          data() {
            return {
              // count: this.$store.state.count,
              //vuex中状态发生改变,并不会再次赋值给count,页面中数据也不会更新,直接在模板中使用state或使用mapState
            };
          },
          computed: {
            ...mapState(["list", "count"]),
            ...mapGetters(["newList"]),
            //  ...mapState({renamecount:count,list})//可以重命名
          },
          methods: {
            ...mapMutations(["increase", "decrease"]),
            ...mapActions(["async"]),
          },
        };
      </script>
      
      1
      2
      3
      4
      5
      6
      7
      8
      9
      10
      11
      12
      13
      14
      15
      16
      17
      18
      19
      20
      21
      22
      23
      24
      25
      26
      27
      28
      29
      30
      31
      32
    • 规范目录结构

      //如果把整个store都放在index.js中是不合理的,所以需要拆分。比较合适的目录格式如下:
      store:.
      │  actions.js
      │  getters.js
      │  index.js
      │  mutations.js
      │  mutations_type.js   ##该项为存放mutaions方法常量的文件,按需要可加入
      │
      └─modules
              Astore.js
      //对应的内容存放在对应的文件中,和以前一样,在index.js中存放并导出store。state中的数据尽量放在index.js中。而modules中的Astore局部模块状态如果多的话也可以进行细分。
      
      1
      2
      3
      4
      5
      6
      7
      8
      9
      10
      11
    • Vue.observable

      const state = Vue.observable({ count: 0 })
      const Demo = {
          render(h) {
              return h('button', {
                  on: { click: () => { state.count++ }}
              }, `count is: ${state.count}`)
          }
      }
      
      1
      2
      3
      4
      5
      6
      7
      8
      <template>
          <div>
              {{ count }}
              <el-button @click="add">add</el-button>
          </div>
      </template>
      <script>
      import Vue from 'vue'
      const store = Vue.observable({
          count: 1
      })
      export default {
          name: "test",
          computed: {
              count() {//模板中使用用computed
                  return store.count
              }
          },
          methods: {
              add() {
                  store.count++
              }
          }
      }
      </script>
      
      1
      2
      3
      4
      5
      6
      7
      8
      9
      10
      11
      12
      13
      14
      15
      16
      17
      18
      19
      20
      21
      22
      23
      24
      25

    # iframe

    <!--父组件-->
    <!--view.html需要在public目录下能够访问-->
    <iframe
            ref="iframe"
            src="/view.html"
            frameborder="no"
            scrolling="no"
            ></iframe>
    <button @click="send('君且西去,春事依然')">send to iframe</button>
    <script>
        export default {
            mounted() {
                const iframe = this.$refs.iframe;
                iframe.onload = () => {
                    //iframe加载完成才能获取iframe的window对象
                    this.iframeWin = iframe.contentWindow;
                };
                window.addEventListener("message", e=> {
                    //监听到子页面的传参
                    console.log(e.data);
                });
            },
            methods:{
                send(msg) {
                    //通过postMessage向iframe传参
                    this.iframeWin.postMessage(msg, "*");
                },
            }
    
        }
    </script>
    
    1
    2
    3
    4
    5
    6
    7
    8
    9
    10
    11
    12
    13
    14
    15
    16
    17
    18
    19
    20
    21
    22
    23
    24
    25
    26
    27
    28
    29
    30
    31
    <h1>iframe</h1>
    <button onClick="send('秋鸿折单复难双,痴人痴怨恨迷狂。')">send to vue</button>
    <script>
        window.addEventListener('message', e => {
            //console.log(e.data);
        })
        function send(msg){
            window.parent.postMessage(msg,'*');
        }
    </script>
    
    1
    2
    3
    4
    5
    6
    7
    8
    9
    10

    # element


    # 配置参考 (opens new window)

    //vue.config.js
    module.exports = {
        // 基本路径
        publicPath:  process.env.NODE_ENV==='production'?'/dist':'/',
        // 输出文件目录
        outputDir: 'dist',
        // webpack-dev-server 相关配置
        devServer: {
            port: 8888,
        },//webpack配置
        lintOnSave:false,   //配置关闭eslint
        configureWebpack: {   
            //警告 webpack 的性能提示
            performance: {
                hints:'warning',
                //入口起点的最大体积
                maxEntrypointSize: 5000000000,
                //生成文件的最大体积
                maxAssetSize: 3000000000,
                //只给出 js 文件的性能提示
                assetFilter: function(assetFilename) {
                    return assetFilename.endsWith('.js');
                }
            }
        }
    }
    
    1
    2
    3
    4
    5
    6
    7
    8
    9
    10
    11
    12
    13
    14
    15
    16
    17
    18
    19
    20
    21
    22
    23
    24
    25
    26

    # 工具


    # 参考

    1. Markdown 基本语法 (opens new window)
    2. Typora 样式 (opens new window)
    3. Vue 从入门到实战 (opens new window)
    4. VueX(Vue 状态管理模式) (opens new window)
    5. vuex 使用详解 (opens new window)
    6. vuex 进阶:mapState、mapGetters... (opens new window)
    7. Vue3+TS 快速上手
    8. 最全 Vue 前端代码风格指南 (opens new window)
    9. Vue技术内幕 (opens new window)
    10. https://juejin.cn/post/6984210440276410399#heading-56
    11. https://juejin.cn/post/7088305435370848263

    Last Updated: 2023/9/1 10:22:59